read full post
Challenge: I have got a test server running, where I usually deploy early builds and proofs of concept for business users to acknowledge. Since recent solution has grown to several websites, so I want users to be able to access all of them. The problem occurs from that users do not have administrative permissions to their PCs and are not able to edit hosts file in order to set multiple host names for my server IP (most of them also are not aware how to do that). The good news is that despite being geographically distributed and being in different virtual networks, they do have access to the server IP address.
Unfortunately, I was not able to specify multiple host names (or IP addresses) to the server as a part of infrastructure configuration, so it became obvious that users should access those websites by IP address, moreover the same IP address to all sites. So what came first into my mind was to distinguish websites by ports within same IIS. Sounds good, but how to do that? I definitely knew that the it resolves website by the host name, not the port, as set within <sites> node of config file. I tried googling a solution but did not find anything...
Investigation: Thus, armed with Reflector and dotPeek tools I started investigating and debugging original code from Sitecore.Kernel.dll. Since a while I came across SiteResolver class, that serves a processor for httpRequestBegin pipeline:
    ...

    ...
So far, so good. The method doing resolving job is called ResolveSiteContext, so I already morally prepared to inherit from SiteResolver class and override that method, implementing site resolution by port.
But what was my excitement, when I notices that it calls SiteContextFactory.GetSiteContext passing hostname, file path and port! So it already supposes port coming from config file, doesn't it? Let's go and inspect this method:
    public static SiteContext GetSiteContext(string hostName, string fullPath, int portNumber)
    {
      fullPath = fullPath.ToLowerInvariant();
      foreach (SiteInfo info in SiteContextFactory.Sites)
      {
        if (info.Matches(hostName, fullPath, portNumber))
          return new SiteContext(info);
      }
      return (SiteContext) null;
    }
and Matches() method follows as:
    public bool Matches(string host, string folder, int portNumber)
    {
      return this.MatchesHost(host) && this.MatchesPort(portNumber) && this.MatchesFolder(folder);
    }
After looking at MatchesPort(portNumber) I chased portNumber and where it comes from. It occurred that parser expects attribute with name "port" and takes the value out of it, or sets default value(0).
Right, so in fact that proves that port number can be solely used for resolving site within same Sitecore instance. But why there is lack of references or documentation about that? In any case this blog post fills the gap, I hope.
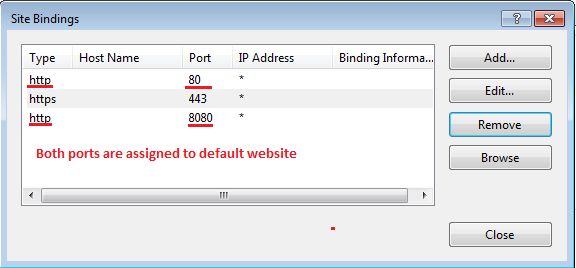
Testing: Now it's time to test my assumption. I have created two bindings for my sitecore instance, for 80 and 8080 ports. Notice that there's no hostnames assigned:
Challenge: I have got a test server running, where I usually deploy early builds and proofs of concept for business users to acknowledge. Since recent solution has grown to several websites, so I want users to be able to access all of them. The problem occurs from that users do not have administrative permissions to their PCs and are not able to edit hosts file in order to set multiple host names for my server IP (most of them also are not aware how to do that). The good news is that despite being geographically distributed and being in different virtual networks, they do have access to the server IP address.
Unfortunately, I was not able to specify multiple host names (or IP addresses) to the server as a part of infrastructure configuration, so it became obvious that users should access those websites by IP address, moreover the same IP address to all sites. So what came first into my mind was to distinguish websites by ports within same IIS. Sounds good, but how to do that? I definitely knew that the it resolves website by the host name, not the port, as set within <sites> node of config file. I tried googling a solution but did not find anything...
Investigation: Thus, armed with Reflector and dotPeek tools I started investigating and debugging original code from Sitecore.Kernel.dll. Since a while I came across SiteResolver class, that serves a processor for httpRequestBegin pipeline:
    ...

    ...
So far, so good. The method doing resolving job is called ResolveSiteContext, so I already morally prepared to inherit from SiteResolver class and override that method, implementing site resolution by port.
But what was my excitement, when I notices that it calls SiteContextFactory.GetSiteContext passing hostname, file path and port! So it already supposes port coming from config file, doesn't it? Let's go and inspect this method:
    public static SiteContext GetSiteContext(string hostName, string fullPath, int portNumber)
    {
      fullPath = fullPath.ToLowerInvariant();
      foreach (SiteInfo info in SiteContextFactory.Sites)
      {
        if (info.Matches(hostName, fullPath, portNumber))
          return new SiteContext(info);
      }
      return (SiteContext) null;
    }
and Matches() method follows as:
    public bool Matches(string host, string folder, int portNumber)
    {
      return this.MatchesHost(host) && this.MatchesPort(portNumber) && this.MatchesFolder(folder);
    }
After looking at MatchesPort(portNumber) I chased portNumber and where it comes from. It occurred that parser expects attribute with name "port" and takes the value out of it, or sets default value(0).
Right, so in fact that proves that port number can be solely used for resolving site within same Sitecore instance. But why there is lack of references or documentation about that? In any case this blog post fills the gap, I hope.
Testing: Now it's time to test my assumption. I have created two bindings for my sitecore instance, for 80 and 8080 ports. Notice that there's no hostnames assigned:
Voila! Hope this hapens to be helpful and may save some efforts for you in future!
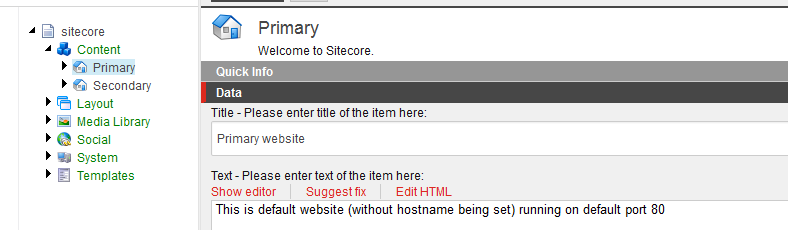
Within Sitecore Desktop I created two website landing pages for each of sites.
Here is te content for Primary website sitting on default 80 port:
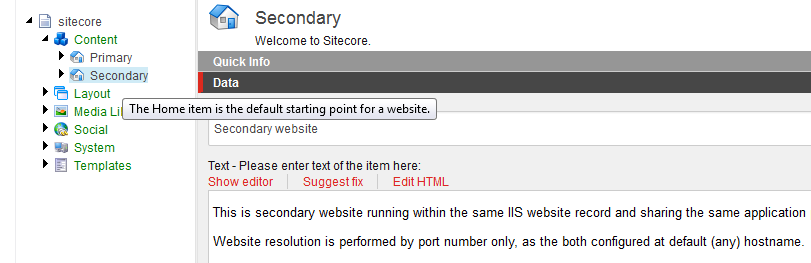
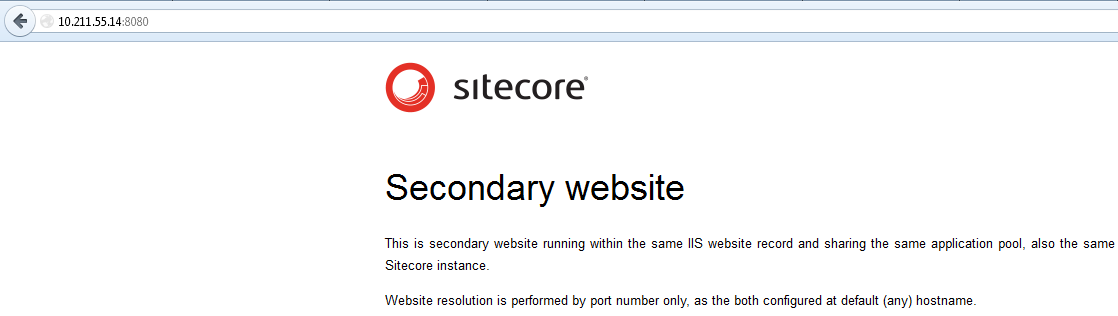
and below is the same for Secondary website on 8080:
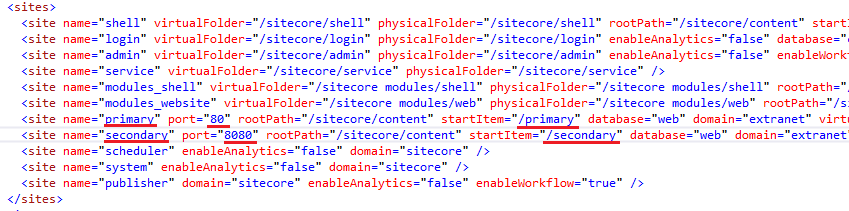
Finally, assign them in the config file. Notice, there is no hostname defined again. Only start item and port number:
Ok, now publish both sites to web database and try accessing them. The first one (primary) opens on default port 80 by simply entering IP address. Expected behavior! It shows content exactly as configured earlier:

Just aplyint port number (8080) to the same IP address we got routed to secondary website. As expected, again:
Voila! Hope this hapens to be helpful and may save some efforts for you in future!